# Login With Oasis
# Overview
In addition to storing sensitive data directly in your app or your Oasis Parcel account, you can also store data in your users' Oasis accounts, giving them full ownership, control, and visibility over their data.
To store data in user accounts, your users need to sign up for Oasis Steward (opens new window), after which you will need to ask them to authenticate themselves to your application. Behind the scenes, users are authenticated via the Oasis Auth service which implements OpenID Connect (opens new window) (OIDC), an identity layer on top of the OAuth 2.0 (opens new window) standard.
# How It Works
Each user is represented by a Parcel identity on the Oasis platform. We will use Oasis Auth to retrieve a unique ID associated with this identity. Then, you can either:
- use Oasis Auth as a single method of authentication for your application, or
- combine Oasis Auth with your application's own authentication method by linking the user's Oasis account with their account in your existing system.
In the example below we will guide our users through the following authentication procedure:
- (In the case of account linking) The user first logs in to your application using the application-specific authentication method. Otherwise, this step is skipped.
- User wants to manage their data through Oasis Steward.
- User is redirected to Oasis Auth.
- User logs in to Oasis Auth (or signs up for the first time).
- On successful login and allowing your app/client to access the user's data, they are redirected back to your application. The callback URL contains an authorization code.
- Your application exchanges the authorization code with Oasis Auth for an ID token.
- Your application extracts a Parcel identity from the ID token.
- (In the case of account linking) A Parcel identity can be linked to your internal user ID.
The steps described above implement a so called explicit authentication flow. If this is the first time you met with the OAuth 2.0 standard and OIDC, we suggest you to read these tutorials (opens new window) up to Chapter 5 (Single-Page Apps) to learn about the authentication basics and other flows.
# Oasis Auth for Backend Web Applications
Let's create a simple Node.js application which executes all application business
logic on the server. We will use openid-client library to perform most of the
OIDC heavy lifting.
EXAMPLE
A complete example can be found in the Parcel Examples repository. We recommend that you use it as a reference while reading this tutorial.
To run the example set your backend client credentials in
src/server.ts,
ACME_BACKEND_CLIENT_ID environment variable to your backend client ID, spin up
the example with npm i && npm start and then visit http://localhost:4050
with your browser.
The first thing we need to do in our backend application is to configure the
openid-client:
// Configure OpenID Connect client.
const PARCEL_AUTH_URL = process.env.PARCEL_AUTH_URL ?? 'https://auth.oasislabs.com';

const issuer = await Issuer.discover(PARCEL_AUTH_URL);

const client = new issuer.Client(
  {
    // Replace with your app's back-end client ID.
    client_id: process.env.ACME_BACKEND_CLIENT_ID!,
    redirect_uris: ['http://localhost:4050/callback'],
    response_types: ['code'],
    token_endpoint_auth_method: 'private_key_jwt',
    token_endpoint_auth_signing_alg: 'ES256',
    id_token_signed_response_alg: 'ES256',
  },
  {
    keys: [
      {
        // Back-end client private key.
        // Note: Make sure kid matches the one you added in portal.
        kid: 'acme-backend-client',
        use: 'sig',
        kty: 'EC',
        crv: 'P-256',
        alg: 'ES256',
        x: 'mqlepd4Gr5L4zEauL2V-3x46cvXFTP10LY4AfOyCjd4',
        y: 'iTMKFMDJVqDDf-Tbt3fVxVs4F84_6nSpMji9uDCE3hY',
        d: 'SjSlVeiDxJ9wFBLIky2WSoUTI3NBJgm2YpbxBpfPQr0',
      },
    ],
  },
);
In the beginning of the snippet above we discover Oasis Auth configuration by
calling Issuer.discover(). Feel free to simply replace the PARCEL_AUTH_URL
constant with the https://auth.oasislabs.com literal.
Then, we create a client with some metadata and a list of private JSON Web Keys. Adapt the following options:
client_idis the client ID of your app's backend client. If you have not generated a backend client in the Parcel developer portal yet, check the Registering Credentials section. Then, export the obtained client ID to theACME_BACKEND_CLIENT_IDenvironment variable.redirect_urismust contain one URL to which the user's browser will be redirected to after the authentication. We will usehttp://localhost:4050/callbacksince we will be locally running Node.js on port 4050 and answering/callbackGET request.WARNING
The redirect URL must be listed in your client's redirect URLs list in the Parcel developer portal! Also, due to security considerations the callback must either use a secure
httpsprotocol or be deployed atlocalhost.Add at least one private JSON Web Key to the list which matches the public key you registered the client with.
We configure specific primitives for verifying the JSON Web Token next. In the snippet
below we generate a unique, 10 bytes long state and nonce:
const state = generators.state(10);
const nonce = generators.nonce(10);
const codeVerifier = generators.codeVerifier();
const codeChallenge = generators.codeChallenge(codeVerifier);
Now we can implement our index page. Since we are developing a backend web
application we will use a simple express framework together with the pug
templating engine for Node.js. We generate the authorization URL by using the
client object we defined above and then inject this URL to the index
template:
app.get('/', (req: express.Request, res: express.Response) => {
  // Obtain authorization URL.
  const authorizationUrl = client.authorizationUrl({
    scope: 'openid profile email parcel.public',
    audience: 'https://api.oasislabs.com/parcel',
    state,
    nonce,
    code_challenge: codeChallenge,
    code_challenge_method: 'S256',
  });
  res.render('index', {
    authUrl: authorizationUrl,
  });
});
Let's look more closely at parameters to generate the authorization URL:
scopeis a space-sparated list of scopes your application would like to obtain.openid,profile, andemailare all standard OpenID claims (opens new window).parcel.publicon the other hand is one of the Parcel-specific access scopes which enable you to call Parcel API methods on behalf of the user. TheAUTHORIZATIONSfield in the Parcel API Specifications defines the minimum authorization level required to call each method. Currently, there are three access scopes corresponding to these authorization levels:parcel.public(least permissive)parcel.safeparcel.full(most permissive)
In the case of insufficient level, the Parcel API endpoint will return the 403 HTTP status code. In our case,
parcel.publicsuffices to count the users' documents which we perform below.audiencefor the Parcel SDK is alwayshttps://api.oasislabs.com/parcel,state,nonce, andcode_challengevalues were initially generated above and will be required in the last step of authorization flow,
The index page is now implemented, so you should be able to see a nice food recipe landing page, if you are running the example code. Notice the following message:
h2 Data Privacy
p
    | Here at Acme ltd., your privacy is very important to us. We've
    | partnered with Oasis Labs so you can own your recipe data from our
    | app.
It is a good idea to motivate users a bit by giving them a context around what Oasis is and why they should take control of their data!
Now, when a user clicks on the authorization URL link, he will be redirected to Oasis Auth. Once logged in, your user will be prompted to share his newly minted Parcel identity address, profile, and email address:
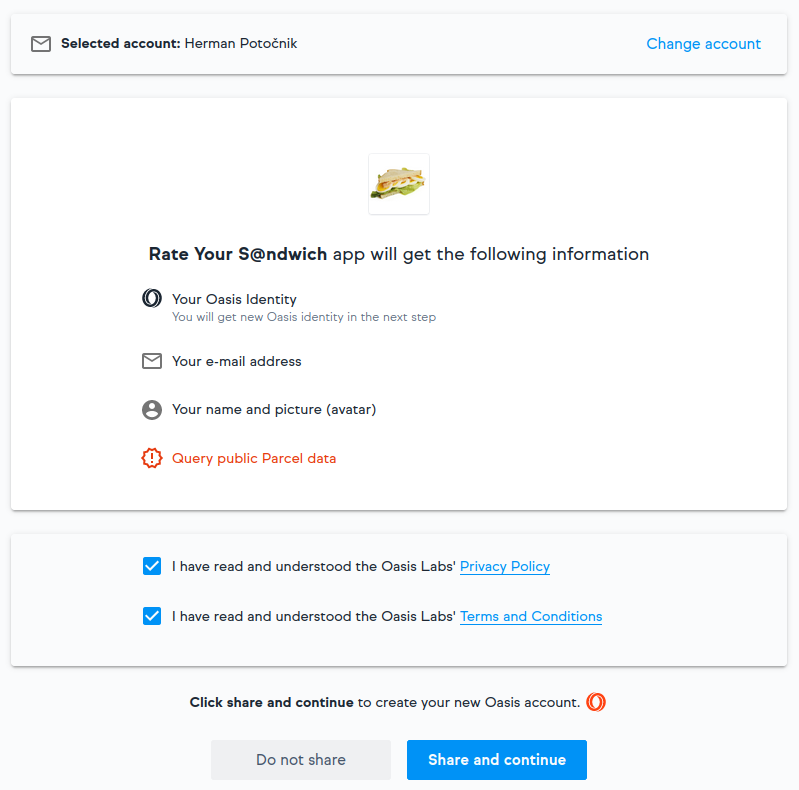
The user's browser will then redirect back to the callback URL you provided in
a redirect_uris client parameter. If the user agreed to sharing their
information, an authorization code and some other callback parameters will be
passed along in the URL.
Finally, we need to implement the callback page. Obtain and verify the
authorization token set from the URL callback parameters using the same
state and nonce we used to generate the authorization URL:
const callbackParams = client.callbackParams(req.url);

// Exchange code for tokens.
const tokenSet = await client.callback(
  'http://localhost:4050/callback',
  callbackParams,
  {
    code_verifier: codeVerifier,
    state,
    nonce,
    response_type: 'code',
  },
  {
    exchangeBody: {
      audience: 'https://api.oasislabs.com/parcel',
    },
  },
);
The authorization token set contains, among others, the ID token which stores the user profile including their Parcel identity and an access token with which we instantiate Parcel and access the API. As a proof of concept, let's count the documents owned by our user:
// Use Parcel API to count the number of owned documents.
const parcel = new Parcel(tokenSet.access_token!);
const parcelId = (await parcel.getCurrentIdentity()).id;
const { results } = await parcel.searchDocuments({
  selectedByCondition: {
    'document.owner': {
      $eq: parcelId,
    },
  },
});

res.render('callback', {
  parcelId,
  documentCount: results.length,
});
Go ahead and try it! If everything goes well, the Parcel identity and the number of documents should match the ones in Oasis Steward (opens new window).
From here on you can link the Parcel identity with the existing user ID in your application's database and start managing the user data with Parcel. To recap, the following sequence diagram illustrates the steps we have implemented in this tutorial:

# Oasis Auth for Static Single-Page Applications
Alternatively, let's look at how to implement the authentication flow in a static, client-side, feature-focused single-page application. In essence, just two implementation details are different:
- In the Parcel developer portal you will need to register a frontend client instead of the backend one.
- You will need to use a JavaScript library for OIDC which works well
in the browser. In our case that will be
oidc-client.
EXAMPLE
Go ahead and check out the frontend example code from the
Parcel Examples
repository first. You can start the example by typing npm i && npm start
after setting the ACME_FRONTEND_CLIENT_ID environment variable.
In contrast to the backend example, all of the business logic will be
implemented on the frontend side, namely in two HTML files:
index.html
and
callback/index.html.
However, for easier development and testing the example will still use Node.js
and express to serve static content.
First, let's look at the index page. We start by creating the configuration for
oidc-client:
const PARCEL_AUTH_URL = process.env.PARCEL_AUTH_URL ?? 'https://auth.oasislabs.com';

const oidcConfig = {
  authority: PARCEL_AUTH_URL,
  // Replace with your app's frontend client ID.
  client_id: process.env.ACME_FRONTEND_CLIENT_ID!,
  redirect_uri: `http://localhost:${port}/callback`,
  response_type: 'code',
  scope: 'openid profile email parcel.public',
  filterProtocolClaims: false,
  loadUserInfo: false,
  extraQueryParams: {
    audience: 'https://api.oasislabs.com/parcel',
  },
  extraTokenParams: {
    audience: 'https://api.oasislabs.com/parcel',
  },
};
It is very similar to the one we used in the backend example for creating the client instance and generating the authorization URL with two modifications:
client_idnow points to the frontend client of your app.- Since the frontend clients don't use a keypair, there is no list of private JSON Web Keys.
Now let's initialize oidc-client with the above configuration:
<script src="/getOidcConfig" type="text/javascript"></script>
<script>
  function authRedirect() {
    Oidc.Log.logger = console;
    Oidc.Log.level = Oidc.Log.DEBUG;
    console.log(oidcConfig)
    const oidcClient = new Oidc.UserManager(oidcConfig);
    oidcClient.signinRedirect();
  }
</script>
TIP
We actually created a configuration above in the backend dynamically to make
use of environment variables and then passed it to the frontend via the
/getOidcConfig action. When the application is deployed the configuration
should reside in a static, publicly accessible asset instead.
The index page is now complete. You can go ahead and try it. When the user
clicks the Get started with Oasis button, oidc-client will obtain the
authorization URL and redirect the user to the Oasis Auth. The authentication
steps which follow are the same as in the backend example.
Based on the configuration we supplied to oidc-client, we need to be ready to
receive the authorization code at https://localhost:4050/callback. We will do
this solely on the frontend side by serving the callback/index.html file.
Inside, we use the following JavaScript snippet:
<script src="/getOidcConfig" type="text/javascript"></script>
<script src="/parcel.js"></script>
<script>
  Oidc.Log.logger = console;
  Oidc.Log.level = Oidc.Log.DEBUG;
  const oidcClient = new Oidc.OidcClient(oidcConfig);
  (async function () {
    const response = await oidcClient.processSigninResponse(location.href);
    const idToken = response.profile;
    document.querySelector('#parcel-id').textContent = `${idToken.sub}`;

    // Use Parcel API to count the number of owned documents.
    const parcel = new Parcel(response.access_token);
    const { results } = await parcel.searchDocuments({
      selectedByCondition: {
        'document.owner': {
          $eq: idToken.sub,
        },
      },
    });
    document.querySelector('#document-count').textContent = `${results.length}`;

    document.querySelector('#result').hidden = false;
  })();
</script>
First, we initialize the oidc-client the same way as we did in the index page.
Then, we exchange the authorization code for the ID token using the
oidcClient.processSigninResponse and passing it the URL-encoded callback
parameters. The resulting object is equal to the ID token used in the
backend tutorial with the sub field containing the user's Parcel identity.
We conclude the example by instantiating Parcel using the access_token from
the authorization code. We count the documents the same way as we did it in the
backend example. Notice that we import the Parcel client with <script src="/parcel.js"></script>
directive. This parcel.js file is served from the local public folder and
was generated from src/parcel.ts wrapper using the
parcel-bundler (opens new window) (unrelated to Oasis Parcel).
Congratulations, now that your users are onboard, you can link their accounts with other services and start managing their data!